【Swift4】StoryboardでUICollectionViewを3分で実装する方法【iOS11】
StoryboardでUICollectionViewを実装する方法をご紹介します。
わかりやすさ重視で、今回はViewControllerに紐づくmain.StoryboardにCollectionViewを実装する手順で紹介しています。
1.StoryboardにCollectionViewを配置する
1-1.CollectionViewを設置する
UICollectionViewを実装したいStoryboardにCollectionViewを配置します。
CollectionViewのサイズなどは任意に調整してください。
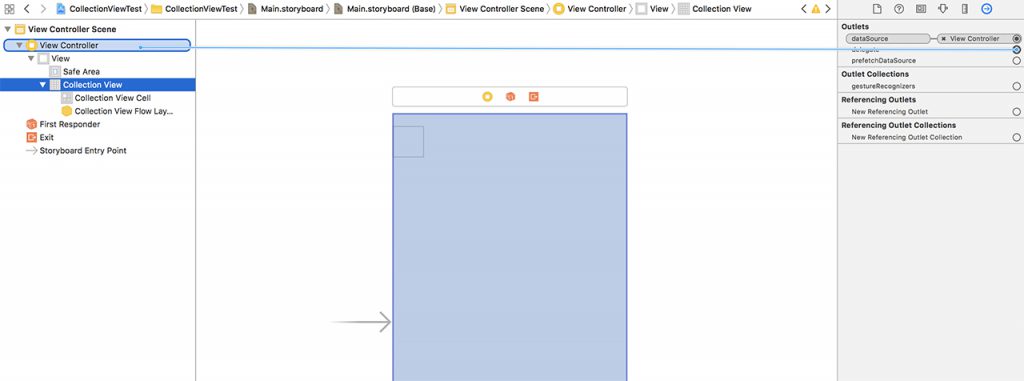
1-2.dataSouceとdelegateを設定する

配置したCollectionViewのOutletsのdataSourceとdelegateを、CollectionViewを実装させるViewControllerにセットします。
このようにdataSouce、delegateが共にViewControllerに紐づけます。
1-3.CollectionViweCellのIdentifierを設定する
配置したCollectionViewの中にあるCollectionViewCellのIdentifierを設定します。
Identifierを設定することでCellの再利用が可能になりメモリに優しい設計となるので忘れずに行なってください。
今回はIndetifierを「Cell」という名前で設定しました。
2.CollectionViewのセクション数やセル数を設定する
2-1.UICollectionViewDelegate, UICollectionViewDataSourceを追加する
class ViewController: UIViewController, UICollectionViewDelegate, UICollectionViewDataSource {
  // UICollectionViewDelegate, UICollectionViewDataSource を追加
}
UICollectionViewDelegate, UICollectionViewDataSourceを設定しdelegateメソッドを追加します。
// セクション数
func numberOfSections(in collectionView: UICollectionView) -> Int {
    return 1
}

// セルの数
func collectionView(_ collectionView: UICollectionView, numberOfItemsInSection section: Int) -> Int {
    return 10
}

// セルを返す
func collectionView(_ collectionView: UICollectionView, cellForItemAt indexPath: IndexPath) -> UICollectionViewCell {
    let cell = collectionView.dequeueReusableCell(withReuseIdentifier: "Cell", for: indexPath)

    //セルの背景色をランダムに設定する。
    cell.backgroundColor = UIColor(red: CGFloat(drand48()),
                                   green: CGFloat(drand48()),
                                   blue: CGFloat(drand48()),
                                   alpha: 1.0)

    return cell
}

// セルをタップした時に呼ばれる
func collectionView(_ collectionView: UICollectionView, didSelectItemAt indexPath: IndexPath) {
    print("セルを押しました")
}
基本的にこの4つは必須です。
2-2.UINibファイル、UICollectionElementKindCellを設定する
override func viewDidLoad() {
    super.viewDidLoad()
    // Do any additional setup after loading the view, typically from a nib.
    UINib(nibName: "UICollectionElementKindCell", bundle:nil)
}
nibファイル「UICollectionElementKindCell」を読み込んでおきます。
let cell = collectionView.dequeueReusableCell(withReuseIdentifier: "Cell", for: indexPath)今回セルの再利用となる行でUICollectionViewCellのカスタムセルを使わず、UICollectionViewCellそのままを使用するためnibファイルの読み込みが必要になります。
3.UICollectionViewDelegateFlowLayoutを使用したレイアウト設定
UICollectionViewのレイアウト方法は大きく分けて3つあります。
1.UICollectionViewFlowLayout を調整する
2.UICollectionViewDelegateFlowLayout を実装する
3.UICollectionViewLayout (Custom) を作成する
その中でもdelegateを使って簡単にレイアウトが実装できる、2.UICollectionViewDelegateFlowLayoutでのレイアウト方法になります。
3-1.UICollectionViewDelegateFlowLayoutを追加する
class ViewController: UIViewController, UICollectionViewDelegate, UICollectionViewDataSource, UICollectionViewDelegateFlowLayout {
  // UICollectionViewDelegateFlowLayout を追加
}
UICollectionViewDelegateFlowLayoutをさらに追加しdelegateメソッドを追加します。
// UICollectionViewの外周余白
func collectionView(_ collectionView: UICollectionView, layout collectionViewLayout: UICollectionViewLayout, insetForSectionAt section: Int) -> UIEdgeInsets {
    return UIEdgeInsets(top: 0, left: 0, bottom: 0, right: 0)
}

// Cellのサイズ
func collectionView(_ collectionView: UICollectionView, layout collectionViewLayout: UICollectionViewLayout, sizeForItemAt indexPath: IndexPath) -> CGSize {
    let cellSize : CGFloat = 100
    return CGSize(width: cellSize, height: cellSize)
}
// 行の最小余白
func collectionView(_ collectionView: UICollectionView, layout collectionViewLayout: UICollectionViewLayout, minimumLineSpacingForSectionAt section: Int) -> CGFloat {
    return 1
}
// 列の最小余白
func collectionView(_ collectionView: UICollectionView, layout collectionViewLayout: UICollectionViewLayout, minimumInteritemSpacingForSectionAt section: Int) -> CGFloat {
    return 1
}
基本的にこの4つでセルのサイズや余白などを調整可能です。
以上で実装は完了となります。

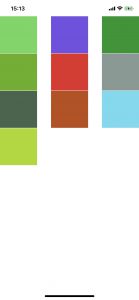
実際にビルドするとこんな感じのCollectionViewが表示されます。
今回のコード部分のまとめは以下のようになります。
import UIKit

class ViewController: UIViewController, UICollectionViewDelegate, UICollectionViewDataSource, UICollectionViewDelegateFlowLayout {

    override func viewDidLoad() {
        super.viewDidLoad()
        // Do any additional setup after loading the view, typically from a nib.
        UINib(nibName: "UICollectionElementKindCell", bundle:nil)
    }

    override func didReceiveMemoryWarning() {
        super.didReceiveMemoryWarning()
        // Dispose of any resources that can be recreated.
    }

    //**************************************************
    // UICollectionViewDelegate,UICollectionViewDataSource
    //**************************************************

    // セクション数
    func numberOfSections(in collectionView: UICollectionView) -> Int {
        return 1
    }

    // セルの数
    func collectionView(_ collectionView: UICollectionView, numberOfItemsInSection section: Int) -> Int {
        return 10
    }

    // セルを返す
    func collectionView(_ collectionView: UICollectionView, cellForItemAt indexPath: IndexPath) -> UICollectionViewCell {
        let cell = collectionView.dequeueReusableCell(withReuseIdentifier: "Cell", for: indexPath)

        //セルの背景色をランダムに設定する。
        cell.backgroundColor = UIColor(red: CGFloat(drand48()),
                                       green: CGFloat(drand48()),
                                       blue: CGFloat(drand48()),
                                       alpha: 1.0)

        return cell
    }

    // セルをタップした時に呼ばれる
    func collectionView(_ collectionView: UICollectionView, didSelectItemAt indexPath: IndexPath) {
        print("セルを押しました")
    }

    //**************************************************
    // UICollectionViewDelegateFlowLayout
    //**************************************************

    // UICollectionViewの外周余白
    func collectionView(_ collectionView: UICollectionView, layout collectionViewLayout: UICollectionViewLayout, insetForSectionAt section: Int) -> UIEdgeInsets {
        return UIEdgeInsets(top: 0, left: 0, bottom: 0, right: 0)
    }

    // Cellのサイズ
    func collectionView(_ collectionView: UICollectionView, layout collectionViewLayout: UICollectionViewLayout, sizeForItemAt indexPath: IndexPath) -> CGSize {
        let cellSize : CGFloat = 100
        return CGSize(width: cellSize, height: cellSize)
    }
    // 行の最小余白
    func collectionView(_ collectionView: UICollectionView, layout collectionViewLayout: UICollectionViewLayout, minimumLineSpacingForSectionAt section: Int) -> CGFloat {
        return 1
    }
    // 列の最小余白
    func collectionView(_ collectionView: UICollectionView, layout collectionViewLayout: UICollectionViewLayout, minimumInteritemSpacingForSectionAt section: Int) -> CGFloat {
        return 1
    }
}


