【Xcode9】AdMobネイティブアドバンス(GADNativeAppInstallAdView)の実装方法【iOS11】【Objective-C】

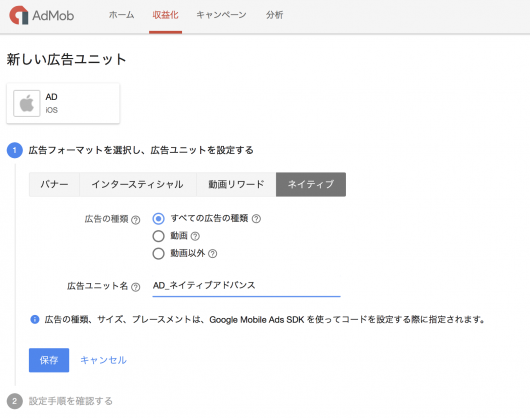
AdMobから新しいネイティブ広告であるネイティブアドバンスが公開されました。既存のネイティブ広告と違い、今回の広告ではiOS特有のxibファイルに対応した広告となっています。
今まではCSSを使用したレイアウト方法だったのですが、これがxibファイルの編集で可能というiOSライクな作りに変更になりました。iOS開発者としてはありがたいですね!
それでは早速実装方法をご紹介していきたいと思います。
AdMob ネイティブアドバンスの実装方法
1.cocoaPodsでAdMobを使えるようにする
まず初めにAdMobをcocoaPodsでインストールします。
pod 'Google-Mobile-Ads-SDK'
次にコードを記述していきます。
2.GoogleMobileAdsのインポート
次にcocoaPodsでインストールしたGoogleMobileAdsをimportします。
#import "ViewController.h"

// AdMobを読み込む
@import GoogleMobileAds;

@interface ViewController ()
3.GADLoaderによる広告の取得とデリゲートの準備
#import "ViewController.h"

@import GoogleMobileAds;

@interface ViewController () <GADNativeContentAdLoaderDelegate,GADNativeAppInstallAdLoaderDelegate,GADVideoControllerDelegate>

@property(nonatomic, strong) GADAdLoader *adLoader;

@end
デリゲート使えるようにするため宣言をしておきます。
- (void)viewDidLoad {
    [super viewDidLoad];
    // Do any additional setup after loading the view, typically from a nib.

    // GADLoaderによる広告取得のリクエスト

    GADMultipleAdsAdLoaderOptions *multipleAdsOptions = [[GADMultipleAdsAdLoaderOptions alloc] init];
    multipleAdsOptions.numberOfAds = 5;

    self.adLoader = [[GADAdLoader alloc] initWithAdUnitID:@"ca-app-pub-xxx"
                                       rootViewController:self
                                                  adTypes:@[kGADAdLoaderAdTypeNativeAppInstall]
                                                  options:@[multipleAdsOptions]];
    self.adLoader.delegate = self;
    [self.adLoader loadRequest:[GADRequest request]];

}
次に広告を取得するためGADLoaderを使用してGoogleに広告取得リクエストを投げます。
リクエストから返却されるデータはデリゲートに流れる仕組みになっています。
- (void)adLoader:(GADAdLoader *)adLoader didReceiveNativeAppInstallAd:(GADNativeAppInstallAd *)nativeAppInstallAd {
    // 広告データを受け取ったら通知されるデリゲート
    NSLog(@"adLoader didReceiveNativeAppInstallAd");
}

- (void)adLoaderDidFinishLoading:(GADAdLoader *)adLoader {
    // 広告の取得リクエストが完了されたら通知されるデリゲート
    NSLog(@"adLoaderDidFinishLoading");
}

- (void)adLoader:(GADAdLoader *)adLoader didFailToReceiveAdWithError:(GADRequestError *)error; {
    // 広告の取得に失敗した時に通知されるデリゲート
    NSLog(@"didFailToReceiveAdWithError:%@",error);
}
広告の取得情報などが取れるデリゲートを実装しておきます。
4.広告を表示するためのXibファイルの作成
次に広告データが受け取れるようになったら、広告データから広告を表示するためのxibファイルを作成します。

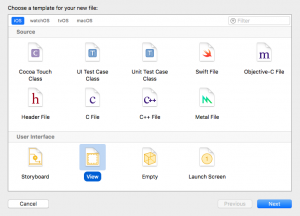
NewFile → iOS → View を選択してください。
ファイル名は何でも大丈夫ですが今回はわかりやすく「GADNativeAppInstallAdView」としています。

次にCustom Classを「GADNativeAppInstallAdView」に変更します。
GADNativeAppInstallAdViewに変更しておかないと紐付けができなくなるので注意してください。

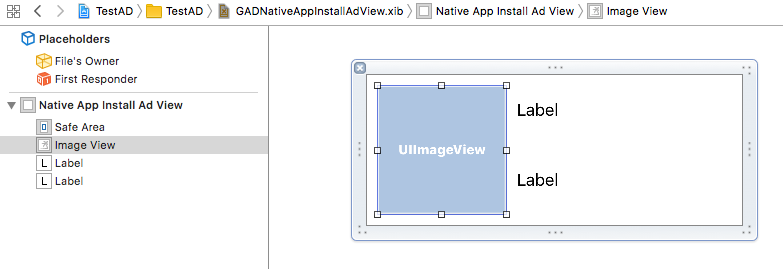
次にアプリアイコン、アプリタイトル、アプリの説明文を表示するためのUIImageViewやUILabelを用意します。

次に作成したUIImageViewやUILabelをGADNativeAppInstallAdViewにあるViewと紐づけていきます。

今回はUIImageViewをIconView、上のUILabelをheadlineView、下のUILabelをbodyViewと紐付けました。
xibファイルの編集は以上です。
5.受け取った広告データを作成したxibファイルのviewに流し込む
最後に広告データを受け取るたびにxibファイルからviewを生成して、生成したviewの各項目に合わせて受け取った広告データを設定するだけです。
- (void)adLoader:(GADAdLoader *)adLoader didReceiveNativeAppInstallAd:(GADNativeAppInstallAd *)nativeAppInstallAd {
    // An app install ad has loaded, and can be displayed.
    NSLog(@"adLoader didReceiveNativeAppInstallAd");

    GADNativeAppInstallAdView *appInstallAdView = [[[NSBundle mainBundle] loadNibNamed:@"GADNativeAppInstallAdView"
                                                                                 owner:nil
                                                                               options:nil] firstObject];
    appInstallAdView.frame = CGRectMake(0,
                                        150*adCount,
                                        self.view.frame.size.width,
                                        150);
    [self.view addSubview:appInstallAdView];

    appInstallAdView.nativeAppInstallAd = nativeAppInstallAd;


    ((UILabel *)appInstallAdView.headlineView).text = nativeAppInstallAd.headline;
    ((UIImageView *)appInstallAdView.iconView).image = nativeAppInstallAd.icon.image;
    ((UILabel *)appInstallAdView.bodyView).text = nativeAppInstallAd.body;
    ((UIImageView *)appInstallAdView.imageView).image =
    ((GADNativeAdImage *)[nativeAppInstallAd.images firstObject]).image;
    [((UIButton *)appInstallAdView.callToActionView)setTitle:nativeAppInstallAd.callToAction
                                                    forState:UIControlStateNormal];

    if (nativeAppInstallAd.store) {
        ((UILabel *)appInstallAdView.storeView).text = nativeAppInstallAd.store;
        appInstallAdView.storeView.hidden = NO;
    } else {
        appInstallAdView.storeView.hidden = YES;
    }

    if (nativeAppInstallAd.price) {
        ((UILabel *)appInstallAdView.priceView).text = nativeAppInstallAd.price;
        appInstallAdView.priceView.hidden = NO;
    } else {
        appInstallAdView.priceView.hidden = YES;
    }

    adCount++;
}
adCountというのを独自に追加していますが、広告が被らないように広告データを取得するごとに広告数をカウントして、広告表示位置をずらしています。
ちなみに最終的にはこのようなコードになりました。
#import "ViewController.h"

@import GoogleMobileAds;

@interface ViewController () <GADNativeContentAdLoaderDelegate,GADNativeAppInstallAdLoaderDelegate,GADVideoControllerDelegate> {
    int adCount;
}

@property(nonatomic, strong) GADAdLoader *adLoader;

@end

@implementation ViewController

- (void)viewDidLoad {
    [super viewDidLoad];
    // Do any additional setup after loading the view, typically from a nib.

    GADMultipleAdsAdLoaderOptions *multipleAdsOptions = [[GADMultipleAdsAdLoaderOptions alloc] init];
    multipleAdsOptions.numberOfAds = 5;

    self.adLoader = [[GADAdLoader alloc] initWithAdUnitID:@"ca-app-pub-xxx"
                                       rootViewController:self
                                                  adTypes:@[kGADAdLoaderAdTypeNativeAppInstall]
                                                  options:@[multipleAdsOptions]];
    self.adLoader.delegate = self;
    [self.adLoader loadRequest:[GADRequest request]];

}


- (void)didReceiveMemoryWarning {
    [super didReceiveMemoryWarning];
    // Dispose of any resources that can be recreated.
}


- (void)adLoader:(GADAdLoader *)adLoader didReceiveNativeAppInstallAd:(GADNativeAppInstallAd *)nativeAppInstallAd {
    NSLog(@"adLoader didReceiveNativeAppInstallAd");

    GADNativeAppInstallAdView *appInstallAdView = [[[NSBundle mainBundle] loadNibNamed:@"GADNativeAppInstallAdView"
                                                                                 owner:nil
                                                                               options:nil] firstObject];
    appInstallAdView.frame = CGRectMake(0,
                                        150*adCount,
                                        self.view.frame.size.width,
                                        150);
    [self.view addSubview:appInstallAdView];

    appInstallAdView.nativeAppInstallAd = nativeAppInstallAd;


    ((UILabel *)appInstallAdView.headlineView).text = nativeAppInstallAd.headline;
    ((UIImageView *)appInstallAdView.iconView).image = nativeAppInstallAd.icon.image;
    ((UILabel *)appInstallAdView.bodyView).text = nativeAppInstallAd.body;
    ((UIImageView *)appInstallAdView.imageView).image =
    ((GADNativeAdImage *)[nativeAppInstallAd.images firstObject]).image;
    [((UIButton *)appInstallAdView.callToActionView)setTitle:nativeAppInstallAd.callToAction
                                                    forState:UIControlStateNormal];

    if (nativeAppInstallAd.store) {
        ((UILabel *)appInstallAdView.storeView).text = nativeAppInstallAd.store;
        appInstallAdView.storeView.hidden = NO;
    } else {
        appInstallAdView.storeView.hidden = YES;
    }

    if (nativeAppInstallAd.price) {
        ((UILabel *)appInstallAdView.priceView).text = nativeAppInstallAd.price;
        appInstallAdView.priceView.hidden = NO;
    } else {
        appInstallAdView.priceView.hidden = YES;
    }

    adCount++;
}

- (void)adLoaderDidFinishLoading:(GADAdLoader *)adLoader {
    NSLog(@"adLoaderDidFinishLoading");
}

- (void)adLoader:(GADAdLoader *)adLoader didFailToReceiveAdWithError:(GADRequestError *)error; {
    NSLog(@"didFailToReceiveAdWithError:%@",error);
}

@end
これで実装は以上です。

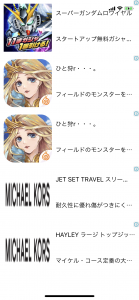
うまく実装できていればこのように表示されるはずです!
最初はとっつきづらいですが、わかってしまえば簡単ですね。
ちなみにネイティブアドバンスにはGADAdLoaderAdTypeNativeAppInstallとGADAdLoaderAdTypeNativeContentの2種類の広告があります。
GADAdLoaderAdTypeNativeContentの広告を取得したい場合はadTypesにkGADAdLoaderAdTypeNativeContentを追加してあげましょう。
self.adLoader = [[GADAdLoader alloc] initWithAdUnitID:@"ca-app-pub-xxx"
                                   rootViewController:self
                                              adTypes:@[kGADAdLoaderAdTypeNativeContent,
                                                        kGADAdLoaderAdTypeNativeAppInstall]
                                              options:@[multipleAdsOptions]];
そしてそれ用のxibファイルとデリゲートの用意も必要です。
xibファイルはGADAdLoaderAdTypeNativeAppInstallと同じ用に作ってください。
デリゲートは以下のように用意してください。
- (void)adLoader:(GADAdLoader *)adLoader didReceiveNativeContentAd:(GADNativeContentAd *)nativeContentAd {
    NSLog(@"adLoader didReceiveNativeContentAd");

    GADNativeContentAdView *contentAdView = [[[NSBundle mainBundle] loadNibNamed:@"GADNativeContentAdView"
                                                                           owner:nil
                                                                         options:nil] firstObject];
    contentAdView.frame = CGRectMake(0,
                                     150*adCount,
                                     self.view.frame.size.width,
                                     150);
    [self.view addSubview:contentAdView];

    contentAdView.nativeContentAd = nativeContentAd;

    ((UILabel *)contentAdView.headlineView).text = nativeContentAd.headline;
    ((UILabel *)contentAdView.bodyView).text = nativeContentAd.body;
    ((UIImageView *)contentAdView.imageView).image =
    ((GADNativeAdImage *)[nativeContentAd.images firstObject]).image;
    ((UILabel *)contentAdView.advertiserView).text = nativeContentAd.advertiser;
    [((UIButton *)contentAdView.callToActionView)setTitle:nativeContentAd.callToAction
                                                 forState:UIControlStateNormal];

    if (nativeContentAd.logo && nativeContentAd.logo.image) {
        ((UIImageView *)contentAdView.logoView).image = nativeContentAd.logo.image;
        contentAdView.logoView.hidden = NO;
    } else {
        contentAdView.logoView.hidden = YES;
    }

    contentAdView.callToActionView.userInteractionEnabled = NO;

    adCount++;
}
これでどちらの広告も出るようになります。
