【Swift4】StoryboardでUITableViewを3分で実装する方法【iOS11】
StoryboardでUITableViewを実装する方法をご紹介します。
わかりやすさ重視で、今回はViewControllerに紐づくmain.StoryboardにUITableViewを実装する手順で紹介しています。
カスタムセルの方法はこちらの記事をご覧ください。
1.StoryboardにTableView、TableViewCellを配置する
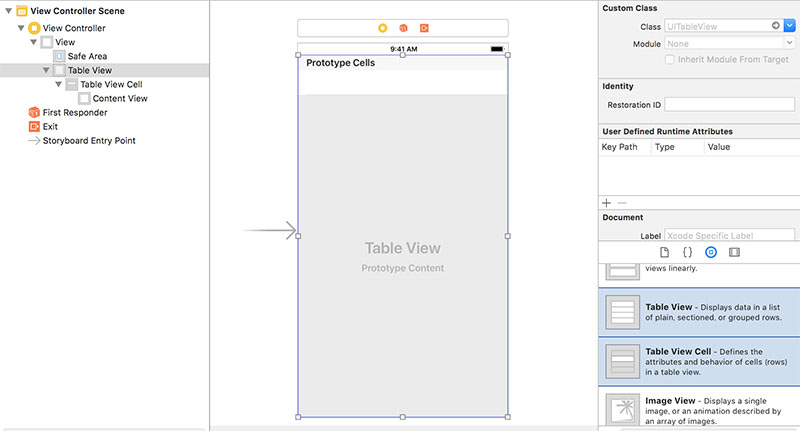
UITableViewを実装したいStoryboardにTableViewを配置します。
TableViewを配置したらその上にTableViewCellを配置します。
TableViewのサイズなどは任意に調整してください。
1-2.dataSouceとdelegateを設定する
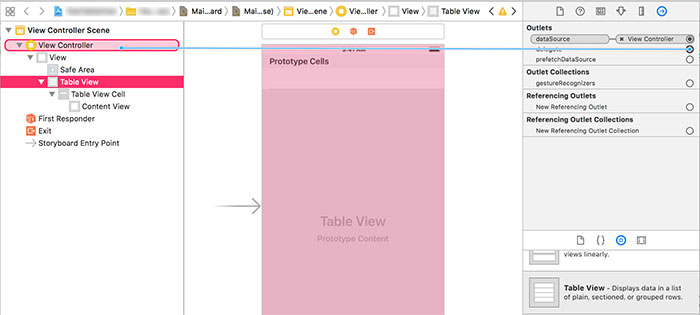
配置したTableViewのOutletsのdataSourceとdelegateを、TableViewを実装させるViewControllerにセットします。
1-3.TableViewCellのIdentifierを設定する
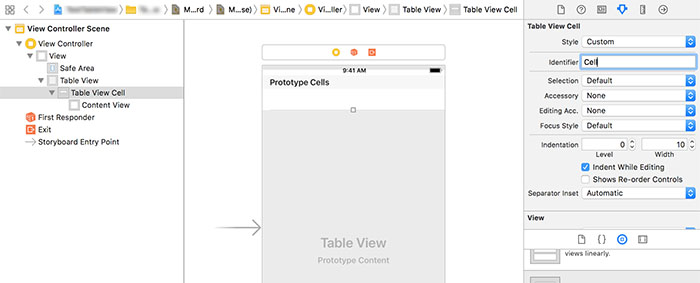
配置したTableViewの中にあるTableViewCellのIdentifierを設定します。
Identifierを設定することでCellの再利用が可能になりメモリに優しい設計となるので忘れずに行なってください。
今回はIndetifierを「Cell」という名前に設定しました。
2.TableViewのセクション数やセル数を設定する
2-1.UITableViewDelegate, UITableViewDataSource を追加する
class ViewController: UIViewController, UITableViewDelegate, UITableViewDataSource {UITableViewDelegate, UITableViewDataSource を設定しdelegateメソッドを追加します。
    // セクションの数
    func numberOfSections(in tableView: UITableView) -> Int {
        return 1
    }

    // セルの数
    func tableView(_ tableView: UITableView, numberOfRowsInSection section: Int) -> Int {
        return 10
    }

    // セルを返す
    func tableView(_ tableView: UITableView, cellForRowAt indexPath: IndexPath) -> UITableViewCell {
        // セルにテキストを出力する。
        let cell = tableView.dequeueReusableCell(withIdentifier:  "Cell", for:indexPath as IndexPath)

        // セルに表示する値(ラベルの文字など)を設定する
        cell.textLabel!.text = "あいうえお"

        return cell
    }

    // セルをタップした時に呼ばれる
    func tableView(_ table: UITableView,didSelectRowAt indexPath: IndexPath) {
        print("セルをタップしました")
    }
基本的にこの4つは必須です。
以上で実装は完了となります。

実際にビルドするとこんな感じのTableViewが表示されます。
今回のコード部分のまとめは以下のようになります。
import UIKit

class ViewController: UIViewController, UITableViewDelegate, UITableViewDataSource {

    override func viewDidLoad() {
        super.viewDidLoad()
        // Do any additional setup after loading the view, typically from a nib.
    }

    override func didReceiveMemoryWarning() {
        super.didReceiveMemoryWarning()
        // Dispose of any resources that can be recreated.
    }

    // セクションの数
    func numberOfSections(in tableView: UITableView) -> Int {
        return 1
    }

    // セルの数
    func tableView(_ tableView: UITableView, numberOfRowsInSection section: Int) -> Int {
        return 10
    }

    // セルを返す
    func tableView(_ tableView: UITableView, cellForRowAt indexPath: IndexPath) -> UITableViewCell {

        // セルにテキストを出力する。
        let cell = tableView.dequeueReusableCell(withIdentifier:  "Cell", for:indexPath as IndexPath)

        // セルに表示する値(ラベルの文字など)を設定する
        cell.textLabel!.text = "あいうえお"

        return cell
    }

    // セルをタップした時に呼ばれる
    func tableView(_ table: UITableView,didSelectRowAt indexPath: IndexPath) {
        print("セルをタップしました")
    }

}
おまけ
NSMutableArrayを使って表示させる方法です
var fruits: NSMutableArray = ["りんご", "みかん", "さくらんぼ", "なし", "すいか"]
表示したいアイテムのArrayを用意します。
    // セルの数
    func tableView(_ tableView: UITableView, numberOfRowsInSection section: Int) -> Int {
        return fruits.count
    }

    // セルを返す
    func tableView(_ tableView: UITableView, cellForRowAt indexPath: IndexPath) -> UITableViewCell {

        // セルにテキストを出力する。
        let cell = tableView.dequeueReusableCell(withIdentifier:  "Cell", for:indexPath as IndexPath)

        // セルに表示する値(ラベルの文字など)を設定する
        cell.textLabel!.text = fruits[indexPath.row] as! String

        return cell
    }
セルの数を用意したArrayの数に、表示するラベルのテキストも用意したArrayに設定します。
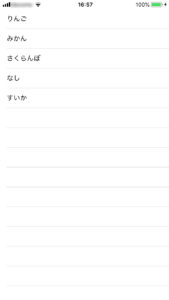 実際にビルドするとこんな感じのTableViewが表示されます。
今回のコード部分のまとめは以下のようになります。
import UIKit

class ViewController: UIViewController, UITableViewDelegate, UITableViewDataSource {

    // セルのテキストArray
    var fruits: NSMutableArray = ["りんご", "みかん", "さくらんぼ", "なし", "すいか"]

    override func viewDidLoad() {
        super.viewDidLoad()
        // Do any additional setup after loading the view, typically from a nib.
    }

    override func didReceiveMemoryWarning() {
        super.didReceiveMemoryWarning()
        // Dispose of any resources that can be recreated.
    }

    // セクションの数
    func numberOfSections(in tableView: UITableView) -> Int {
        return 1
    }

    // セルの数
    func tableView(_ tableView: UITableView, numberOfRowsInSection section: Int) -> Int {
        return fruits.count
    }

    // セルを返す
    func tableView(_ tableView: UITableView, cellForRowAt indexPath: IndexPath) -> UITableViewCell {

        // セルにテキストを出力する。
        let cell = tableView.dequeueReusableCell(withIdentifier:  "Cell", for:indexPath as IndexPath)

        // セルに表示する値(ラベルの文字など)を設定する
        cell.textLabel!.text = fruits[indexPath.row] as! String

        return cell
    }

    // セルをタップした時に呼ばれる
    func tableView(_ table: UITableView,didSelectRowAt indexPath: IndexPath) {
        print("セルをタップしました")
    }

}